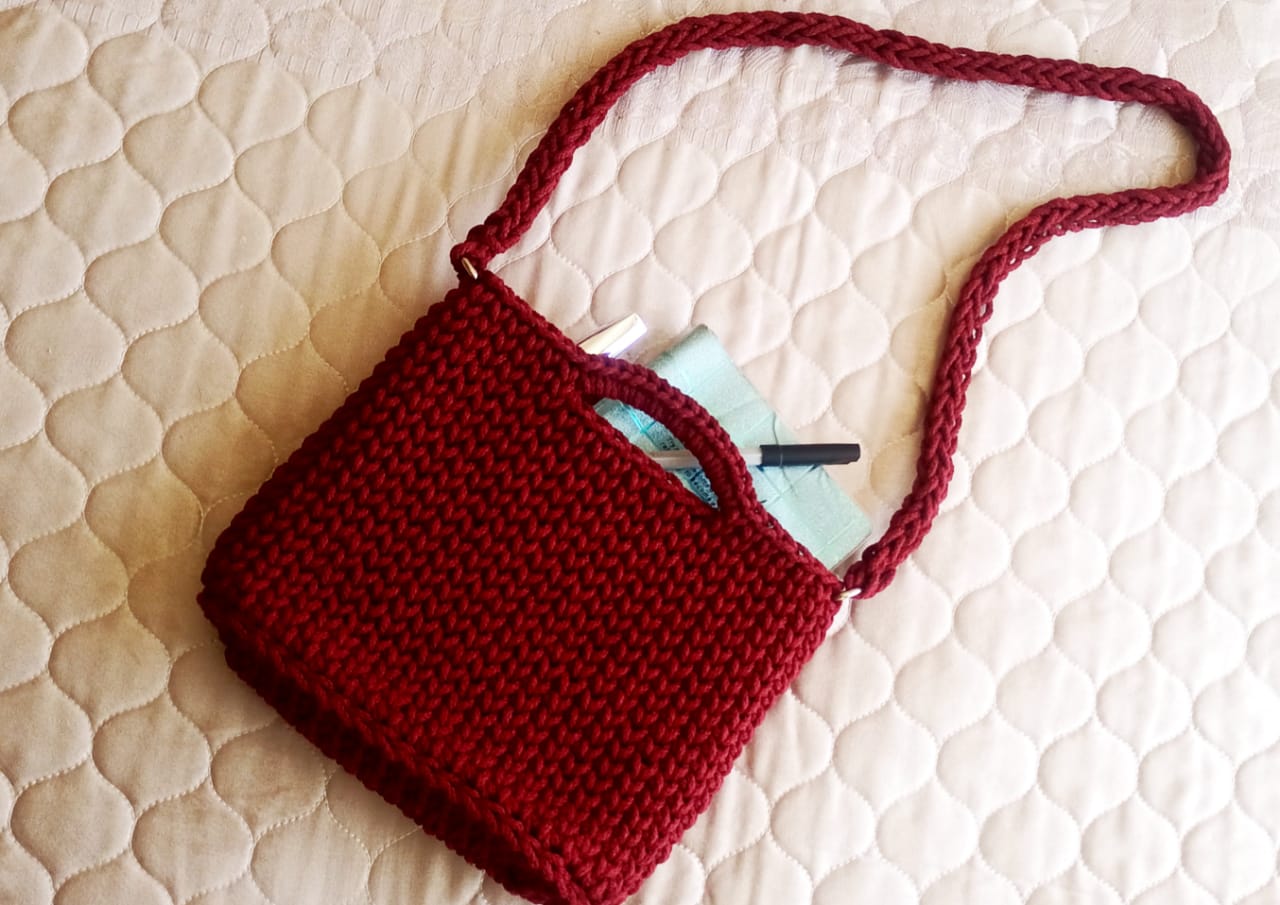
The Bubbly crochet crossbody bag pattern is a free written pattern which also comes with a step by step video tutorial. This crossbody bag is a miniature version of the Chic crochet bag. The knit stitch in this pattern gives the bag a rigid structure and this is plus in terms of maintaining the bag shape.
To crochet this Bubbly crossbody bag, you need to know how to crochet single crochet and slip stitch. I will explain how to crochet the knit stitch in the pattern below. If you want to put a button on to this bag you can check out the forest green bag pattern on how to attach the button. The Other bag pattern also has instructions on how to insert a zipper to a crochet bag.

Crochet crossbody bag pattern Material list:
- Crochet Hook size 5mm
- Macramé/ Rope or t-shirt yarn or any other bulky yarn that is about 3mm thick
- Meters used – 145m
- Scissors
- 6 Stitch markers
- 2 Metal rings
Finished bag measurements
9.5 inches width, 7.4 inches height
Gauge
4 inches = 9 stitches by 11 rows
Crochet Terms in US Terminology
- join – join two stitches together , done by working a slip stitch in the top of the next stitch
- rep – repeat (do it again)
- inc – means increase that is crochet two or more stitches in one stitch
- st (s) – stitch(es)
- ** – means do what is written in-between the asterisks (for example rep** , means repeat what is written in between the asterisks)
Stitch guide
- ch – chain
- sl st – slip stitch
- sc – single crochet
Pattern notes:
- You are going to work in rounds.
- The number in the brackets at the end of each instruction is the total number of stitches for that round.
Instructions for the Crochet crossbody bag pattern:
Make the bag in 3 steps
- Step 1 – the bottom
- Step 2 – the sides
- Step 3 – the handles
The knit stitch/ waistcoat stitch
The knit stitch will be used in all the steps. Here is how you crochet the knit stitch:
Insert the hook between the front “legs” of the stitch (rather than the upper portion of the stitch) then work a regular single crochet stitch.

Crochet crossbody bag pattern Step 1- The Bottom
Foundation round: ch 15. Sc 1 in the 2nd ch from the hook and put a st marker (take note of the color of this st marker or if possible it should be a different color from the rest of the markers as it also marks the starting point of our round), continue with sc in the next 12 ch. Sc 4 in the last ch and put 3 st markers into the last 3 sts (of the 4 sc that you just crocheted). Continue to crochet at the back of the chains, sc 3 in the last chain and put 2 st markers into the last 2 sts. (32)

NB: From here on wards you crochet knit st. Refer to the top on how to crochet knit st.
Round 2: put 2 knit stitches in the 1st st (put back the st marker into the 1st st of the increase, also this st marker is marking the starting point), *continue with 1 knit st in the following sts which do not have stitch markers until you reach a st marker, crochet 2 knit sts in the sts with st markers (put back the st marker into the 1st st of the increase).* Repeat from * to * until you are back at the starting point. (38)

Round 3: repeat round 2. (44).
Round 4: remove all the other st markers and remain with the one that marks the starting point (the one in the first st). Slip st in each st right around. This completes the bottom. It should look as shown below:

Step 2 – The Sides
Round 1: Start with sc 1 in the outer loop of the first st put back the st marker in the first st, continue with 1sc in each st (back loop) until the round is done. (44)


Round 2: *crochet 1 knit stitch in each st right round (you can refer at the top on how to crochet the knit stitch)*, repeat from * to * until you finish the round. (44)
Round 3 to round 18: repeat round 2.
Step 3 – The Handles
Round 19: starting from the first st, put a st marker in st number 3; 12; 25; 34

*Put 1 knit st in each st, at the next st marker, remove it and crochet into that st then chain 8,skip the 8 sts continue by joining the ch into the next st marker with knit st.* This is your first handle. Carry on from there Repeat from * to until you are back at the starting point.

Round 20
Divide the total number of your stitches to get 22. Put a stitch marker at the point the sides turn, count 22 st from there and put another one in the 23rd st (we are going to put the small metal rings in these stitches).

*Crochet 1 knit st in each of the following sts. When you reach the handles, crochet single crochet around the chain. Continue with 1 knit st in each st until you reach the st marker. Take the metal ring and crochet through it (crochet through the metal ring into the st before and the st with the marker)* as shown below. Repeat from * to * until the round is done. Join the last st to the first st with a slip st, pull through the yarn, cut and fasten off the ends.


The cross body handle
Do a slip knot and attach it to the metal ring with a single crochet. Insert your hook into the ring and pull up a loop to have two loops on the handle, insert again into the ring and pull up a loop to have three loops on your hook.

*Remove the crochet hook from the loops making sure that you do not lose a loop. Insert your hook in the first loop and pull up a loop, insert in the second loose loop and pull up a loop, insert into the 3rd loose loop and pull up a loop to have 3 loops on the hook.* repeat from* to * until you have one meter length of handle or desired length.

Attach the three loops to the other metal ring. To do this, remove your hook from the loops. Pull one loop through the metal ring then crochet 1 sc afterwards pull the second loop and sc 1. From there repeat with the 3rd loop until you are left with one loop on the hook. Pull through the yarn cut and fasten off the ends to finish up.

Fasten off all the other ends. the bag is done. Here is the step by step video tutorial.