
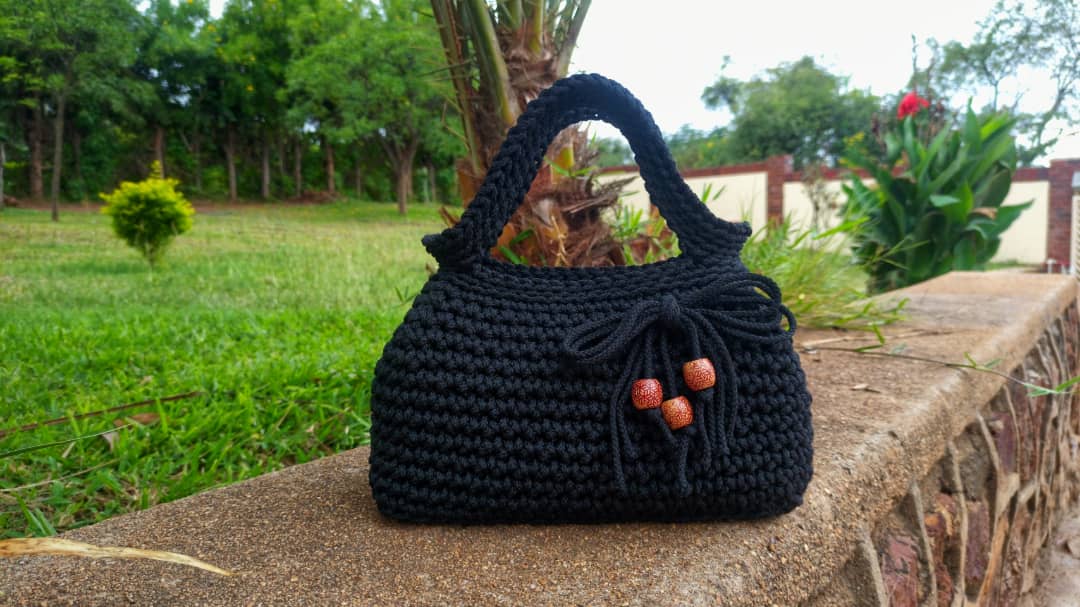
The Other handbag pattern is a simple and easy crochet bag pattern. The thought of designing the Other handbag, as the name implies came about when I needed another bag different from the ones that I had, the Chic crochet bag pattern, the Mellow tote bag pattern and others. This time I wanted something different, a bag that is portable, small and luscious at the same time.
You can also check the link to the video tutorial at the bottom of the post.

Level of skill Required:
To crochet the Other handbag, you have to know how to crochet single crochet and slip stitch. Check out the Japanese knot bag pattern, which you can also crochet using single crochet and slip stitch only.
Crochet a bag pattern: the Other handbag Material list :
- Crochet Hook size 6mm
- Macramé/ Rope or t-shirt yarn or any other bulky yarn that is about 3 mm thick
- Meters used – 160 meters
- Scissors
- Zipper
- Sewing needle, sewing thread (black and any other bright color for the zipper)
- 6 Stitch markers
- 3 wooden beads
Tension:
Gauge: 4″ = 9 rows x 10 stitches
One size bag
Finished bag measurements
6 inches height and 10 inches width
Crochet Terms in US Terminology
- join – join two stitches together , done by working a slip stitch in the top of the next stitch
- rep – repeat (do it again)
- inc – means increase that is crochet two or more stitches in one stitch
- st (s) – stitch(es)
- ** – means do what is written in-between the asterisks (for example rep** , means repeat what is written in between the asterisks)
Stitch guide
- ch – chain
- sl st – slip stitch
- sc – single crochet
Pattern notes:
- Crochet The bottom/ base of the bag in rows and the sides in rounds.
How to decrease the number of crochet stitches (sc2tog – single crochet two together)
Here is how you decrease your stitches:
Insert your hook in a stitch and pull up a loop to have 2 loops on your hook. Insert into the following stitch and pull up a loop so that you have 3 loops on hook. Yarn over and pull through all three loops, to form a stitch. This way you have decreased your stitches with 1.
Crochet a bag pattern: the Other handbag Instructions:
These are the 4 steps of making the bag:
- Step 1 – the bottom
- Step 2 – the sides
- Step 3 – the zipper
- Step 4 – the handle and the ribbon
Crochet a bag pattern:Step 1- The Bottom
Foundation row: ch 21. Sc 1 in the 2nd ch from the hook, continue with sc until all the chains are done. At the end of the chains Ch 1 and turn.
Row 2: Sc 1 in the 1st st , continue with 1 sc in the following sts until the row is done. At the end of the row chain 1 and turn.
Row 3 to row 11: repeat row 2. Put a stitch marker in the first st of row 11.
After completing row 11, do not turn but rather continue crocheting single crochet on all the sides of the bottom (also at each corner put two stitches) until you are back at the starting point where you put a stitch marker earlier on. At the end of the round count your stitches, they should be 63. This way we form a round. The bottom of the crochet bag is done on completion of this round

Crochet a bag pattern: the Other handbag Step 2 – The Sides
From here onward we will be crocheting in rounds.
Round 1: single crochet 1 stitch into the back loop of the first st put back the st marker in the first st, continue with 1sc in the back loop of each st until the round is done.
Round 2: put 1 sc in each st (at the top of the st below both loops, not back loop as we were doing in the first round) right round until the round is done.
From Round 3 to round 9: repeat round 2.
After completing round 9, counting from the first st, put stitch markers in st number 21, 32 and 53. To have 4 stitch markers including the one marking the starting point. Make sure the color of the stitch marker in the first st is different from the rest, so that we are able to identify the starting point.

Round 10: in the first stitch, remove the stitch marker and sc2tog (refer to the top on how to decrease the number of stitches- sc2tog). * Put back the stitch marker into the stitch you just did. Sc 1 in the following sts until you are at the next st marker. Sc2tog at the next st with a stitch marker.* repeat from * to * until you are back at the starting point.
Round 11 and 12: repeat round 10.
Round 13: remove the other 3 st markers and remain with the one that marks the starting point. Sc1 in each stitch until the round is done.
Round 14: insert your hook in the back loop and do slip st, continue with slip stitch in the back loop of the following stitches until the round is done. We will carry on from round 14 when we are done with the zipper of the crochet bag
Crochet a bag pattern Step 3 – attaching the zipper
Crocheting one side to put the zipper on:
Row 1: Go to the second stitch of round 13, insert your hook in the back bump of that stitch (inside the bag as shown below) and do a slip knot.

Continue with 1sc in the following back bumps until you have a row of 15 sc as shown below. Chain 1 and turn.

Row 2: sc 1 in each of the row 15 stitches that you just did (until you are back at the other end)
Row 3 and row 4: repeat row 2

After completing this side, crochet the other side directly opposite the one you just did repeating from row 1 to row 4. The two sides should be exactly the same and their stitches should correspond to each other as shown below

Sewing the zipper on:
Take your zipper and leave a tail of about 10 cm, using a bright thread tack one side of the zipper onto one side that we just did above as shown below

Repeat and temporarily attach the other side of the zipper as shown below

From there, take the black thread and sew permanently along the bright thread (in this case the bright thread is yellow). Do this on both sides. After sewing with the black thread remove the yellow thread.

Step 4:The handles
Round 15: This is a continuation from round 14 of the sides. Crochet Slip stitch in the back loop in each stitch until you are back at the starting point.
Afterwards, counting from the first st, put stitch markers in stitch number 4, 19, 29 and 44.
Round 16: slip st in the back loop of the first st, continue with slip stitch in the back loop of the following stitches until you reach the next stitch marker (in stitch number 4). Crochet slip stitch by inserting your hook below the two loops (not the back loop, this is to ensure a strong attachment of the handle.) From there chain 27 ( this is our first handle) and then attach the chain in the next stitch marker with slip st (st number 19 below both loops). Afterwards continue in the following stitches with slip stitch in the back loop until you reach the next stitch marker.
In the next stitch marker (in stitch number 29) crochet slip stitch by inserting your hook below the two loops, chain 27 (this is our second handle) and attach the chain in the next stitch marker with slip st (st number 44 below both loops) continue in the following stitches with slip stitch in the back loop until you finish the round.

Round 17: slip stitch in the back loop of every stitch including the handles
Round 18 and round 19; repeat round 17
Inserting the ribbon accessory:
Take 4 strands of yarn that are about 40 cm long and tie a shoelace knot or bow knot (the way you tie your shoes or a bow) as shown below:

Insert a small piece of yarn at the back of the knot (ribbon) and use this piece of yarn to tie or attach the ribbon to the bag. After attaching the ribbon to the bag, take the three beads and insert them onto three strings of the ribbon. Fasten the strands with the beads to prevent the beads from falling out. Trim the ends of the strands on the ribbon for a nice finish.
- Fasten off all the ends to finish the bag
- Your crochet bag is complete.
Watch the video tutorial here