
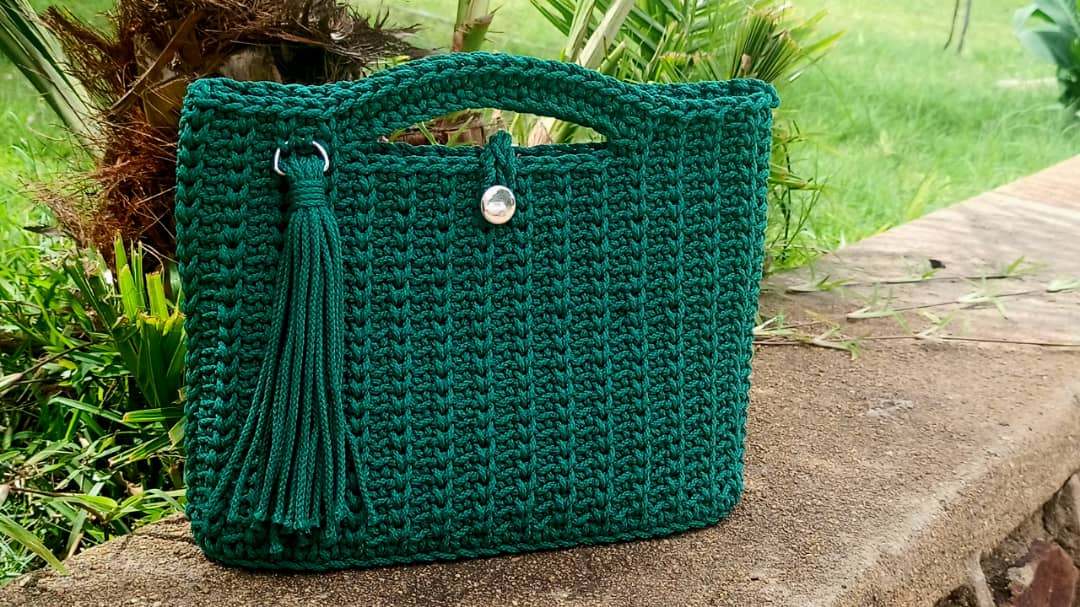
Crochet a handbag for a change. This pattern is for the Forest Green classic handbag. There are some occasions that require classic crochet bags…. Yes classic designer bags and this is where the Forest green classic crochet bag comes in.
What I love most about this classic crochet handbag is the way the knit stitch and the single crochet in the back loop connect together to bring out a beautiful crochet pattern. The crochet bag itself screams elegant and classic. Talking about classic handbags, here is another one the Chic Classic crochet bag pattern.
So if you are looking for a bag that brings out the Lady in you, this one is for you. The pattern is very easy to follow, it is a one round repeat until you finish. If you need a video tutorial do not worry there is a link to the video tutorial at the bottom. You can also check out this Portable crochet bag.

Yarn used
I usually prefer to use macrame on most of my crochet bags. I also did another classic crochet handbag, the Sparkling Classic crochet bag, similar to this one. Macrame for me creates a firm crochet handbag, however it may be a bit stiff to crochet with if one is not used to working with it. With time you get to love macrame. This one here is braided macrame. It can either be cotton or polyester macrame. If you do not have macrame, it’s fine t- shirt yarn also produces the same firmness as macrame. Just make sure to test the Guage.
Crochet a handbag Level of skill Required:
In order for you to crochet this bag, you only need to know how to crochet single crochet, slip stitch and chain. I am going to explain how to crochet the knit stitch down below.
Material list:
Materials needed for the free crochet bag pattern:
- Crochet Hook size 6mm
- Macramé/ Rope or t-shirt yarn or any other bulky yarn that is about 3mm thick
- Meters used – 250m/273 Yards
- Scissors
- Button (20mm diameter)
- Sewing needle and sewing thread (for the button)
- 6 Stitch markers
- Metal ring for the tassel
Tension:
Gauge: 4″ = 10 rows x 9 stitches
One size bag
Finished bag measurements
9,5 inches height and 13 inches width
Crochet Terms in US Terminology
- join – join two stitches together , done by working a slip stitch in the top of the next stitch
- rep – repeat (do it again)
- inc – means increase that is crochet two or more stitches in one stitch
- st (s) – stitch(es)
- ** – means do what is written in-between the asterisks (for example rep** , means repeat what is written in between the asterisks)
Stitch guide
- ch – chain
- sl st – slip stitch
- sc – single crochet
Free crochet bag pattern notes:
- You are going to work in rounds.
- The number in the brackets at the end of each instruction is the total number of stitches for that round.
crochet a handbag pattern Instructions:
The bag is made in 4 steps
- Step 1 – the bottom
- Step 2 – the sides
- Step 3 – the handles
- Step 4 – the button, button hole and the tassel
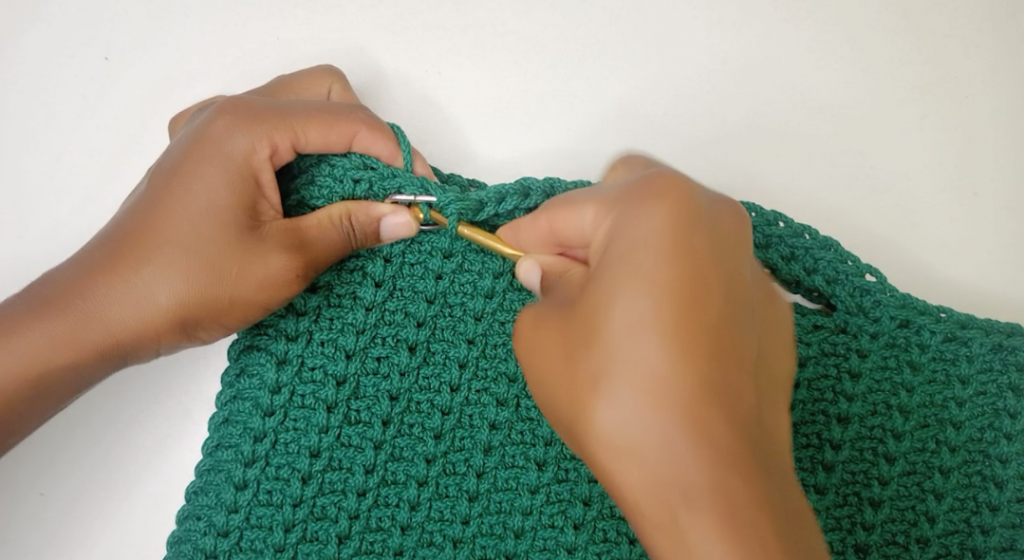
The knit stitch/ waistcoat stitch
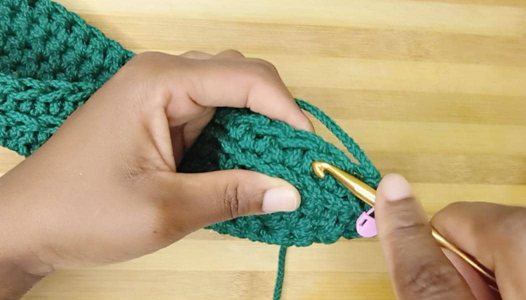
The knit stitch will be used in step 2 and step 3. Here is how you crochet the knit stitch: Insert the hook between the “legs” of the stitch (rather than the upper portion of the stitch) then work the usual single crochet stitch.
Step 1- The Bottom of the classic crochet bag
Foundation round: ch 21. Sc 1 in the 2nd ch from the hook and put a st marker (take note of the color of this st marker or if possible it should be a different color from the rest of the markers as it also marks the starting point of our round), continue with sc in the next 18 ch. Sc 4 in the last ch and put 3 st markers into the 3 sts of the 4 sc that you just crocheted. Now crochet into the other side of the chain as shown below, sc in the next 18 ch (back of the chains), sc 3 in the last chain and put 2 st markers into the last 2 sts. Therefore you should have st markers in st number 1, 21,22,23,43,44. (44)


You should have 6 stitches with stitch markers. In the next rounds these are the stitches which we are going to put an increase that is put 2 sc in each until we finish the bottom.
NB:
Note that from here onwards we are going to crochet 2 sc in the sts with st markers, and putting back the st marker into the first stitch of the increase. This is going to be done until the bottom of the bag is done.
Round 2: Sc 2 in the 1st st (put back the st marker into the 1st st of the increase), *sc 1 in the following sts which do not have stitch markers until you reach a st marker, sc 2 in the sts with st markers (put back the st marker into the 1st st of the increase).* Repeat from * to * until you are back at the starting point. (50)
Round 3 and 4: repeat round 2. That is in every stitch with a stitch marker you increase that is put 2 sc then in the stitches without the stitch markers you put 1 sc until the round is done. Round 4 should have a total of 62 st
Round 5: remove all the other st markers and remain with the one that marks the starting point (the one in the first st). Slip st in each sc around. Chain 1 (this chain does not count as a st). This completes the bottom. It should look as shown below:
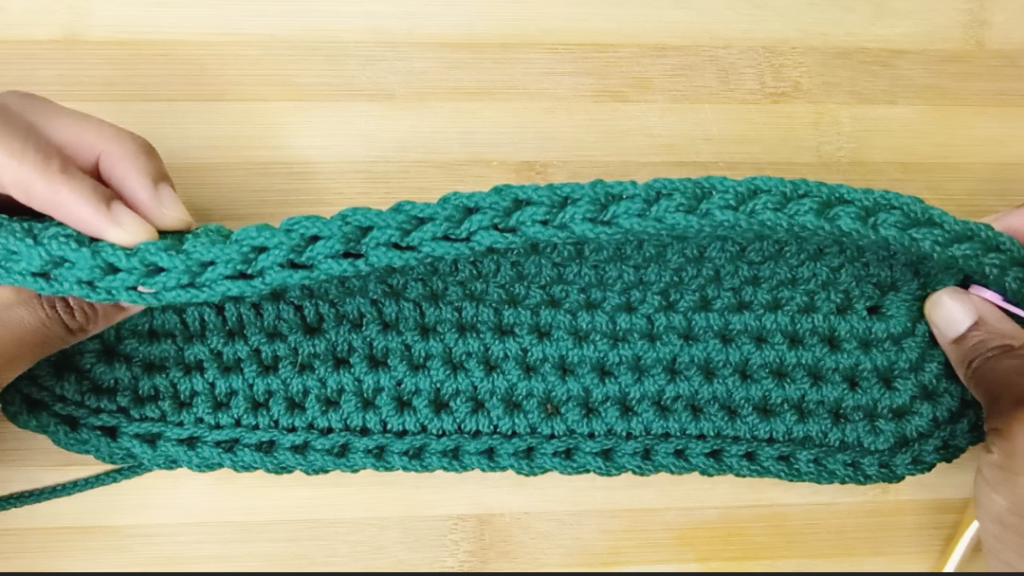
The side of the bottom should have 3 loops
Step 2 – The Sides of the classic crochet bag pattern
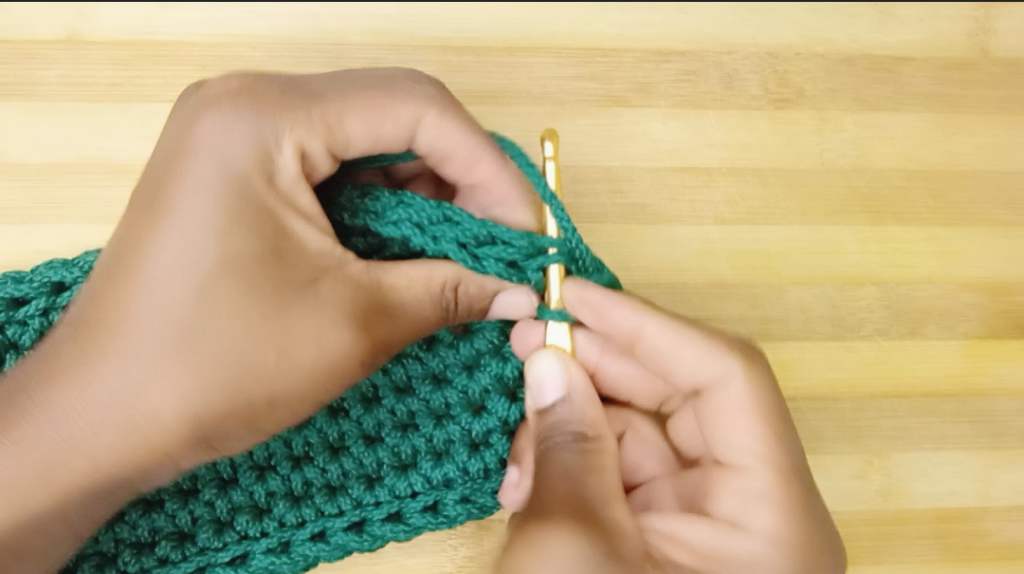
Round 1: sc 1 into the top two loops of the first st (do not insert your hook through the slip st) put back the st marker in the first st, continue with 1sc in each st (top two loops) until the round is done. Do not crochet in the chain 1.

Round 1 of the sides completed
Round 2: 1 sc in the back loop of the 1st stitch (remember to put back the st marker in the first st), knit stitch in the 2nd st (you can refer at the top on how to crochet the knit stitch),* in the next st 1 sc in the back loop followed by a knit st in the following st*, repeat from * to * until you finish the round. Your last st should be a knit st. (62)
Round 3 to round 21: repeat round 2. The knit stitches will follow a straight line as the rounds increase as well as the sc in the back loop they form a straight pattern going up.

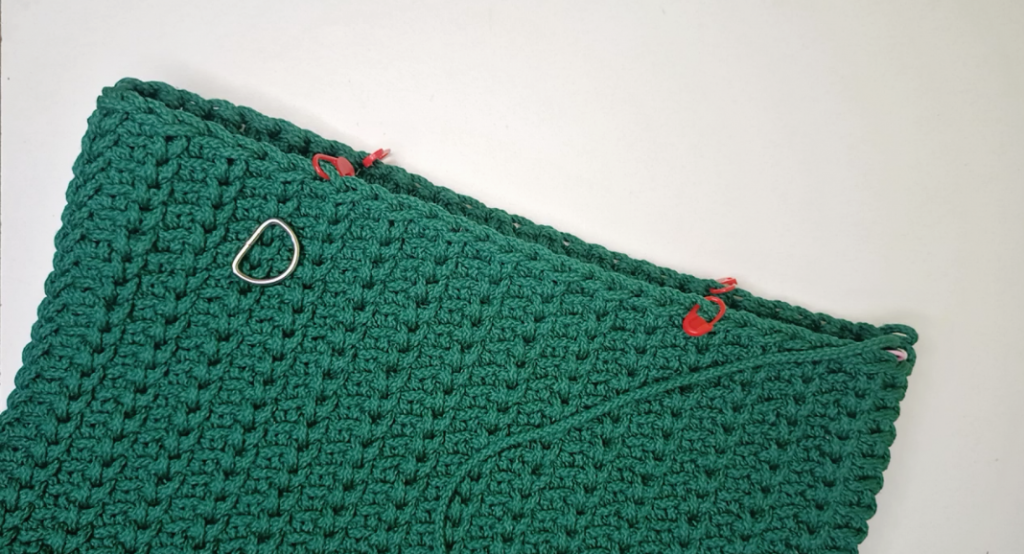
From round 21 of step 2.
Step 3 : Crochet a handbag : The handles
Round 22: starting from the first st, count 9 st and put a st marker in the 9th st, skip 13 sts and put a st marker in the 23rd st, put again another st marker in the 40th st, skip 13 sts and put a st marker in the 53rd st.
Continuing with the pattern of sc in the back loop and knit st, crochet in the first 9 st, chain 14 and skip 13 sts, crochet in the next 18 sts, chain 14 and skip 13 sts, crochet in the remaining 9 sts and the round is complete.

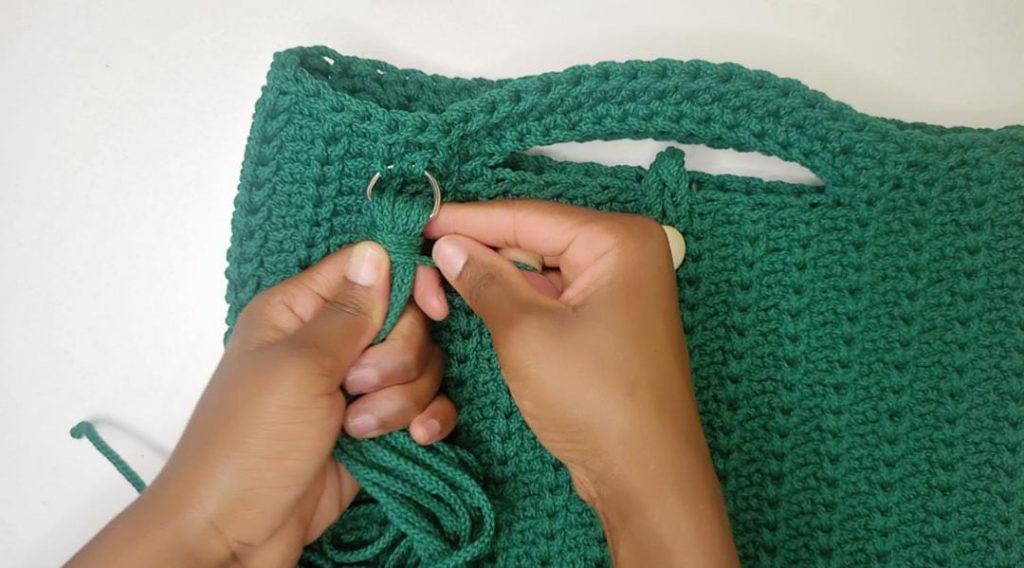
Round 23: crochet the pattern of sc in the back loop followed by knit stitch, repeat until you reach the chain of 14, sc the chain of 14. Continue with sc in the back loop followed by knit st also along the way place the metal ring for the tassel and crochet through the ring, sc in the next chain of 14, continue with sc in the back loop followed by knit st until the round is completed.
Round 24: repeat round 23 (excluding the metal ring). At the end join the last st to the first st with a slip st, cut and fasten off the ends. The handles are done.
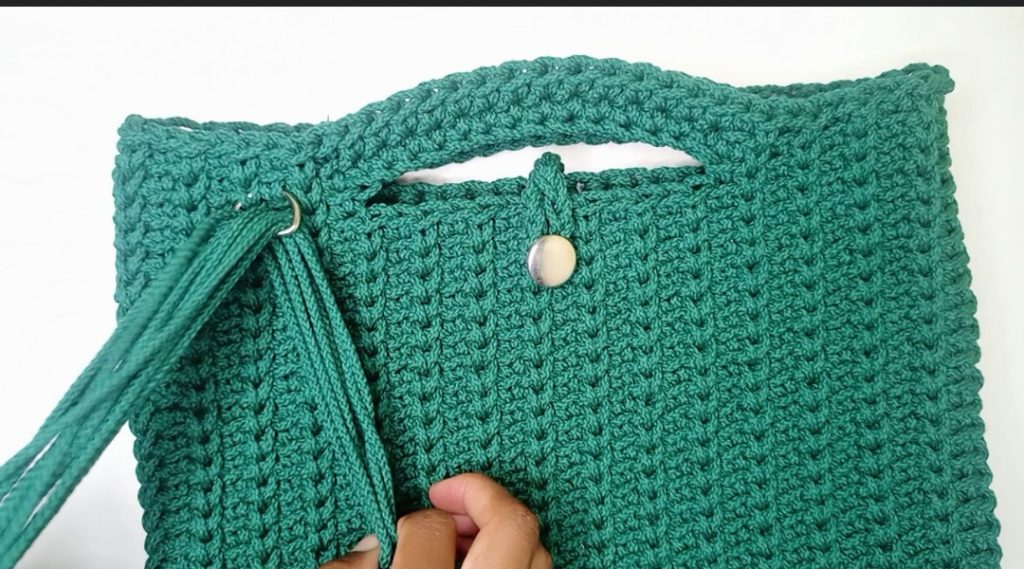
Step 4 crochet a handbag :Button Hole And The Tassel
- Sew the button just below the handle of one side at the center as shown below:

On the center of the other side chain 9 so that the chain is able to wrap around the button on the other side. Join on the 6th chain from the hook with slip stitch and continue with slip st into the remaining chains until you are back at the starting point (that is the center).

For the tassel cut 10 strands of yarn which are about 18 inches long, insert them through the metal ring. Tie the strands together just below the metal ring. Trim the ends of the strands to get a nice finish
- Cut and fasten off the ends to finish the bag
Your forest green classic crochet bag pattern is done.
Let me know if you have tried this bag and if you liked it. The step by step video tutorial is found here.
- Crochet Like a Pro: Must-Know Crochet Tricks for Every Crocheter
- Trendy crochet purse pattern: The Brown Bliss Bag Pattern
- Yarn for crocheting: A Beginner’s Guide to Picking the Right Yarn for Crocheting
- How to crochet a purse pattern: Rylee Purse
- Crochet tote bag pattern: The Orange tote bag